How to PAT Test
In this article, we will demonstrate how to PAT test some common appliances. We've turned to Google to provide us with a list of the top 10 appliances that people are seeking guidance on how to PAT test. From kettles and TVs to laptops and phone chargers, this article will provide a guide on how to PAT test these frequently queried items.
However, it's important to note that PAT testing should always be conducted by a competent person. This means someone who has the necessary skills, knowledge, and experience to perform the tests safely and correctly. If you're unsure about any aspect of PAT testing, it's crucial to seek professional advice or training.
If you are interested in learning how to PAT test, our PAT testing course will equip you with the necessary skills and knowledge to become a competent PAT tester. Our courses cover everything from the basics of appliance safety to the principles and practical guidance on PAT testing various appliances.
Visual Inspection

Before we start any testing on an appliance, the first step, and the most important, is the visual inspection. Most faults will be identified during the visual inspection stage. We are checking for any defects that could compromise the safety of the appliance. It should start with a check of the equipment's exterior for any signs of damage, such as cracks, loose parts, or evidence of overheating. The supply cable should be examined for any signs of fraying, cuts, or damage. The plug or connector should also be inspected for any damage, including cracking or bent pins. If the equipment has a rewireable plug, it should be opened to confirm that the wiring is neat, secure, and correctly placed. The fuse should be checked and the cord grip should be secure and gripping the outer sheath of the cable.
Should any signs of damage, faults, or misuse be found, or if the equipment is unsuitable for the environment in which it is being used, it is important to report these issues immediately. The equipment should be labelled as 'failed', and no further electrical tests should be conducted until the issues have been addressed.
How to PAT Test a Kettle

Before conducting any electrical tests, a visual inspection must be carried out first. Given that kettles are often used in kitchen environments, it's important to consider the appliance's location and usage. For instance, the kettle should be positioned far enough from the sink to prevent water splashes and accidental falls into the sink while connected to the power supply.
The mineral-insulated heating element within the kettle can absorb moisture over time, potentially affecting the insulation resistance test result. If moisture absorption is suspected, it's advisable to empty the kettle, then briefly switch it on for 10 to 20 seconds to evaporate any absorbed moisture.
Most modern kettles are jug-style with a detachable base and should be tested as a complete unit. As Class I appliances, kettles first undergo an earth continuity test. To start, connect the test lead to an earthed metal part. For plastic kettles, the accessible earthed metal is the heating element. The element may have a limescale covering, so ensure good contact with the metal surface by breaking through the limescale layer with your probe or crocodile clip. If using a mains-powered PAT tester, select a high current test (20 - 25A). This will help to break through any limescale contamination. If using a battery-powered tester, the test will be low current (100 - 200mA), making it more susceptible to contact resistance caused by limescale. The measured resistance should be 0.1Ω or lower. If the reading is higher, try to scratch through the limescale more thoroughly. For more details, please refer to our separate article on the earth continuity limit.
The next PAT test measures insulation resistance. If your tester has 250V and 500V test options, set it to 500V and ensure the kettle switch is in the 'on' position. The insulation resistance measurement should be 1MΩ or greater.
Most test instruments automatically conduct an optional leakage or sub-leakage test following the insulation test. If using a mains-powered tester, this will power on the kettle, so remove the test lead from the element and add some water. The earth leakage must not exceed 5 mA. For more information, We have a separate article on the leakage current test.
The final test is a function check. Ensure the kettle operates correctly, with any power lights working and the kettle switching off when the water starts to boil. Some test instruments will also carry out a load test. Most kettles are rated at around 1,800W - 2,200W, so you should expect the load reading to be within this range.
If the kettle passes the visual inspection and electrical tests, label it as 'passed' and record the results.
How to PAT Test a TV

Before conducting any electrical tests on a television, it's crucial to determine its construction type: is it Class I or Class II? A Class II device will display a double square symbol on the power rating plate. If this symbol is absent, the TV is of Class I construction.
Earth Continuity - Class I
The initial test for a Class I TV is an earth continuity test. If you're using a mains-powered test instrument, select a low-current (100mA to 200mA) test to prevent potential damage to the TV's electronic circuits. Battery-powered test instruments will automatically use a low-current test. Connect the test lead to an earthed metal part, such as the threads of the bracket mounting holes on the back of modern flat-screen TVs. The measured resistance should be less than 0.1Ω plus the resistance of the supply cable. In most cases, the cable resistance is negligible. If the resistance exceeds 0.1Ω, refer to our article on the earth continuity limit for further information.
Insulation Resistance - Class I & Class II
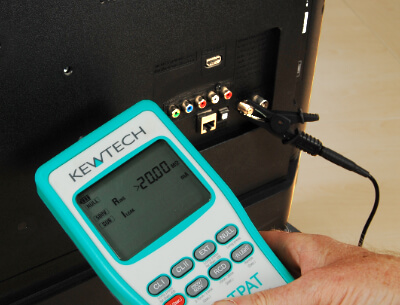
If the TV has a power button, set it to the 'on' position and set the test to 500V. For Class II TVs, attach the test lead to an exposed metal part. The resistance must be 1MΩ or greater for Class I, and 2MΩ or greater for Class II.
Leakage (Optional) - Class I & Class II
The leakage test is optional but useful for modern TVs without a physical on/off switch. This test powers up the TV, allowing it to be switched on. For Class II TVs, attach the test lead to an exposed metal part. The leakage current must not exceed 5mA for both Class I and Class II TVs
Sub-leakage (Optional) - Class I & Class II
Most battery-powered test instruments will automatically conduct a sub-leakage test. This test, similar to a leakage test but conducted at a reduced voltage, has the same 5mA limit. Some battery-powered test instruments can connect to a mains supply to conduct a full leakage test at mains voltage.
Functional Check
Finally, ensure the TV is functioning correctly. If a leakage test has been conducted, most testers will also display the power consumption. This varies depending on the TV type and size, but generally falls within the 50W to 200W range.
If the TV passes the visual inspection and electrical tests, label it as 'passed' and record the results.
How to PAT Test a Microwave, Fridge, or Washing Machine
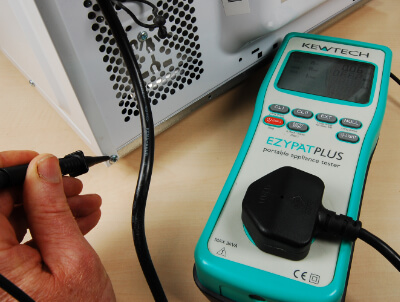
Testing these appliances follows a similar process as they are all metal-cased Class I appliances. The first test is an earth continuity test. For mains-powered test instruments, select a high-current test. Connect the test lead to an earthed metal part on the appliance, ideally one of the screws holding the case together. Avoid attaching the test lead to the appliance door, as this will usually result in a higher reading due to being in contact with the earthed metal case, rather than being intentionally earthed. The measured resistance should be less than 0.1Ω plus the resistance of the supply cable, which is usually negligible. If the resistance exceeds 0.1Ω, refer to the troubleshooting section.
The next test is the insulation resistance test, which requires the appliance to be switched on. For microwaves and washing machines with a mechanical switch, turn this to the 'on' position. For fridges, keeping the door open during the visual inspection should heat up the thermostat sufficiently to trigger it to switch on. The insulation resistance must be 1MΩ or greater.

For microwaves and washing machines without a physical on/off switch, an additional leakage test can be conducted. This powers up the appliance, allowing it to be switched on. Before starting this powered test for microwaves, place a cup of water inside. The earth leakage must not exceed 5mA.
Finally, conduct a simple functional check to ensure the appliance powers up and operates correctly. For microwaves, check that the door interlock switch operates correctly by opening the door while in operation; this should halt the cooking process. We also have a separate article on conducting an optional microwave radiation leakage test.
How to PAT Test a Laptop

A laptop, being an extra-low-voltage device that typically operates at 16 - 20 volts, does not require testing. However, its mains charger can and should be tested. There are two types of charger constructions: Class II and Class II FE (Functional Earth). Class II chargers can be identified by the double square symbol. Most Class II FE chargers do not bear the Class II FE symbol, but if a charger lacks the standard double square symbol, it can be assumed to be of Class II FE construction.
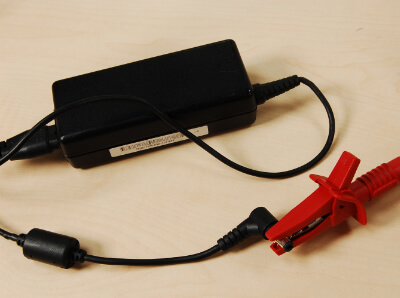
For Class II laptop chargers, the test lead should be connected to the metal of the connector that attaches to the laptop. For Class II FE chargers, there's no need to connect the test lead.
The test voltage should be set to 500V, and the insulation resistance should be at least 2MΩ. Following this, most testers will automatically conduct an optional sub-leakage test. The leakage for this test should not exceed 5mA.
Laptop chargers typically come with a detachable power cord. Given that these cords are often interchangeable with various other devices, it's standard practice to label and record both the cord and the charger. Class II chargers usually feature a power cable with a figure-8 type connector, which cannot be tested, but should undergo a visual inspection. Class II FE chargers, on the other hand, typically have a lead with either a standard IEC type connector or a cloverleaf connector. These can be tested as standard leads, though leads with a cloverleaf connector will require an adapter for connection to the test instrument.
How to PAT Test an Extension Lead
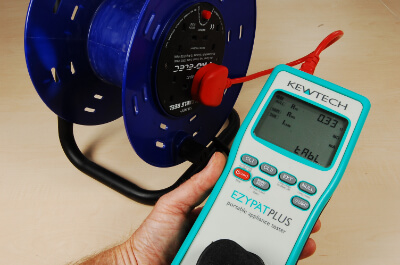
Most test instruments feature a specific test sequence for extension leads. To conduct these tests, first plug the 13A plug of the extension lead into the PAT test instrument. Then, use an IEC test lead to connect the socket on the extension lead back into the IEC socket on the test instrument. For multiway extension leads, connect the IEC lead to the last socket at the end.
| CSA mm2 | Resistance Ω/m |
|---|---|
| 0.5 | 0.039 |
| 0.75 | 0.026 |
| 1.0 | 0.0195 |
| 1.25 | 0.0156 |
| 1.5 | 0.0133 |
The first test conducted is the earth continuity test. The limit for this test is 0.1Ω plus the resistance of the cable. For longer extension leads, an allowance must be made for the resistance of the cable. This can be calculated using the cable resistance table to determine the total maximum allowable earth continuity resistance. Your PAT test instrument may be preset with a limit of 0.1Ω, which will need to be overridden with the calculated value. For further information, refer to our article on the earth continuity limit
Next, the insulation resistance test is conducted. For surge-protected extension leads, a test voltage of 250V should be used. For all other extension leads, a 500V test should be selected. The limit for this test is set at 1MΩ. However, we should expect to see the insulation resistance of an extension lead much higher than this, usually to the limit of the test instrument range, typically 19.99MΩ.
Finally, a polarity test is conducted to check for a possible live and neutral reversal. This ensures that the wiring of the extension lead is correct and safe for use.
How to PAT Test a Phone Charger
The prevalence of substandard and counterfeit mobile phone chargers sold online poses a significant issue. During the visual inspection process, it's crucial to be mindful of this problem. We have an article with further information to help identify substandard and counterfeit chargers.
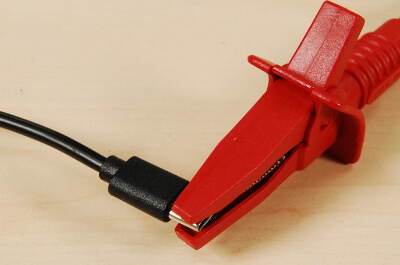
Mobile phone chargers are Class II items, so in order to measure the insulation resistance, the test lead must be connected to the exposed metal parts on the connector that plugs into the phone. The test voltage should be set to 500V. The insulation resistance must be at least 2MΩ. Most test instruments will also automatically carry out an optional sub-leakage test. For this test, the leakage current should not exceed the limit of 5mA.
How to PAT Test a Computer
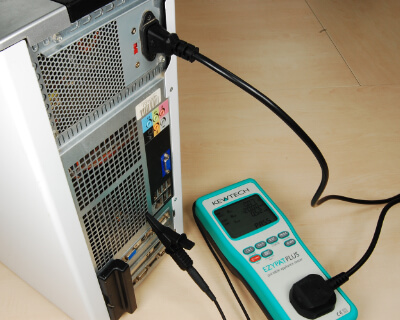
Desktop computers are typically Class I items. Before starting the electrical tests, it's necessary to attach the test lead to measure earth continuity. There's usually plenty of exposed metal on the back of a computer to which the test lead can be attached.
When using a mains-powered PAT test instrument, it's important to conduct the earth continuity test as a low-current test to avoid the risk of damaging the IT equipment. This concern doesn't apply to battery-powered test instruments, as they only perform low-current tests. The maximum resistance for earth continuity is 0.1Ω plus the resistance of the power cord.
The next test is the insulation resistance test, which should have a resistance of 1MΩ or greater. Most test instruments will then automatically conduct an optional sub-leakage test, with a limit of 5mA. It's advisable to avoid performing a mains leakage test on computers, as this test powers on the equipment for a few seconds, which can cause issues when restarting IT equipment.
You should inspect, test, label, and record any detachable power cords and monitors connected to the computer separately.
Conclusion
In conclusion, PAT testing requires an understanding of the different types of appliances and their specific testing requirements. This article has provided a guide on how to PAT test some of the most common appliances. However, it's important to remember that PAT testing should always be conducted by a competent person. If you're unsure about any aspect of PAT testing, consider enrolling in a PAT testing course to gain the necessary skills and knowledge.